I’ll admit that I’ve always been a little envious of 17-inch laptops though, but I’ve been hung up on three things: low dpi screens, size and cost. Fix two of those three issues and I might be interested. That’s why when I recently found a heck of a deal on the new Alienware 17 R3, I just had to try it.
The model I got and tested in this post includes a Skylake quad-core processor, Nivida GTX 980M graphics, NVMe storage and a 4K screen. Minus a better CPU option, this unit is pretty much the most you can put into a laptop. After a couple weeks of using it, I’ve gotten to know it quite well and all I have to say so far is that I’m really liking it.
Check out why in the sections below.
Alienware 17 R3 (A17-9935)
Processor : Intel Core i7-6700HQ 2.6 GHz (Intel Core i7)
Graphics adapter : NVIDIA GeForce GTX 980M - 4096 MB, Core: 1038 MHz, Memory: 2500 MHz, GDDR5, ForceWare 353.54, Optimus
Memory : 8192 MB , 2x 4 GB DDR4-2133, Dual-Channel, 2 of 2 slots occupied, up to 32 GB
Display : 17.3 inch 16:9, 1920x1080 pixel, CV69H_173WF4 (LGD0459), IPS, Full HD, glossy: no
Mainboard : Intel Sunrise Point HM170
Storage : Samsung PM951 NVMe 512 GB, 512 GB , SSD + HGST Travelstar 7K1000 (HTS721010A9E630), 1000 GB HDD @ 7200 rpm. Slots: 1x M.2 Type 2280 & 1x 2.5-inch
Weight : 3.71 kg ( = 130.87 oz / 8.18 pounds), Power Supply: 810 g ( = 28.57 oz / 1.79 pounds)
Price : 2000 EUR
Design and exterior
Let’s be clear on this first – this is not a very portable machine. But it is quite a bit thinner and lighter than the old m17x I remember seeing in stores a few years back. Weighing just over 8 lbs and being nearly an inch and a half thick, I struggled a little bit picking it up with one hand. It’s certainly possible to do though and I’m a little more at ease now that I’ve had to lug it around my house for the past couple weeks. This is something I could certainly live with.Overall, the build quality is pretty good – about as good as I remembered with the m11x. It’s mostly plastic, but the lid is made of aluminum. The plastic they chose to use was good quality though and feels like it could take a beating over time. I can certainly see this machine staying clean for the most part, with exception to the palm rest. During my short usage it was obvious to see when my palms were sweaty. Being plastic though, it was very easy to wipe up and get clean again.


 The lid is made with a piece of silver anodized aluminum. The top
strip is plastic and there are also come cutouts in the aluminum for the
lights and the Alienware logo. The logo’s eyes will glow in the same
color as the cutouts on the lid, which you have multiple different
colors to choose from. The cuts and angles on the lid are very unique,
but surprisingly not over the top in being too flashy. If anything, the
lights do that, but you can turn them off. Minus the Alienware head, you
could probably get away with using this laptop professionally, if you
wanted.
The lid is made with a piece of silver anodized aluminum. The top
strip is plastic and there are also come cutouts in the aluminum for the
lights and the Alienware logo. The logo’s eyes will glow in the same
color as the cutouts on the lid, which you have multiple different
colors to choose from. The cuts and angles on the lid are very unique,
but surprisingly not over the top in being too flashy. If anything, the
lights do that, but you can turn them off. Minus the Alienware head, you
could probably get away with using this laptop professionally, if you
wanted.Opening the lid is a two handed task. The hinge is just too strong to do it with just a finger. Underneath, you’ll see a full layout keyboard and underneath that is a trackpad, which is kind of small in my opinion, but gets the job done. I’ll get more into these two later. The power button is located centrally above the keyboard and the indicator lights are located on the upper left.
The screen on my model is a matte 4K panel. It’s surrounded by a plastic bezel, which is relatively thin on all the edges except the bottom. Also on the bottom is the Alienware logo, which can also illuminate to whatever color you desire.
Connectivity options are pretty abundant on this laptop. On the left edge, you have the power connector, Noble Lock Port, 2x USB 3.0, microphone and headphone. Their placement is very intuitive and I was able to use them in dark rooms with zero issues.


On the right hand side, starting from the back is the gigabit Ethernet connection. In front of that you have a single USB 3.0 port, followed by a USB-C 3.1 port which is also Thunderbolt 3 capable. Finally, there’s a 3-in-1 card reader, which also comes with a slot cover.
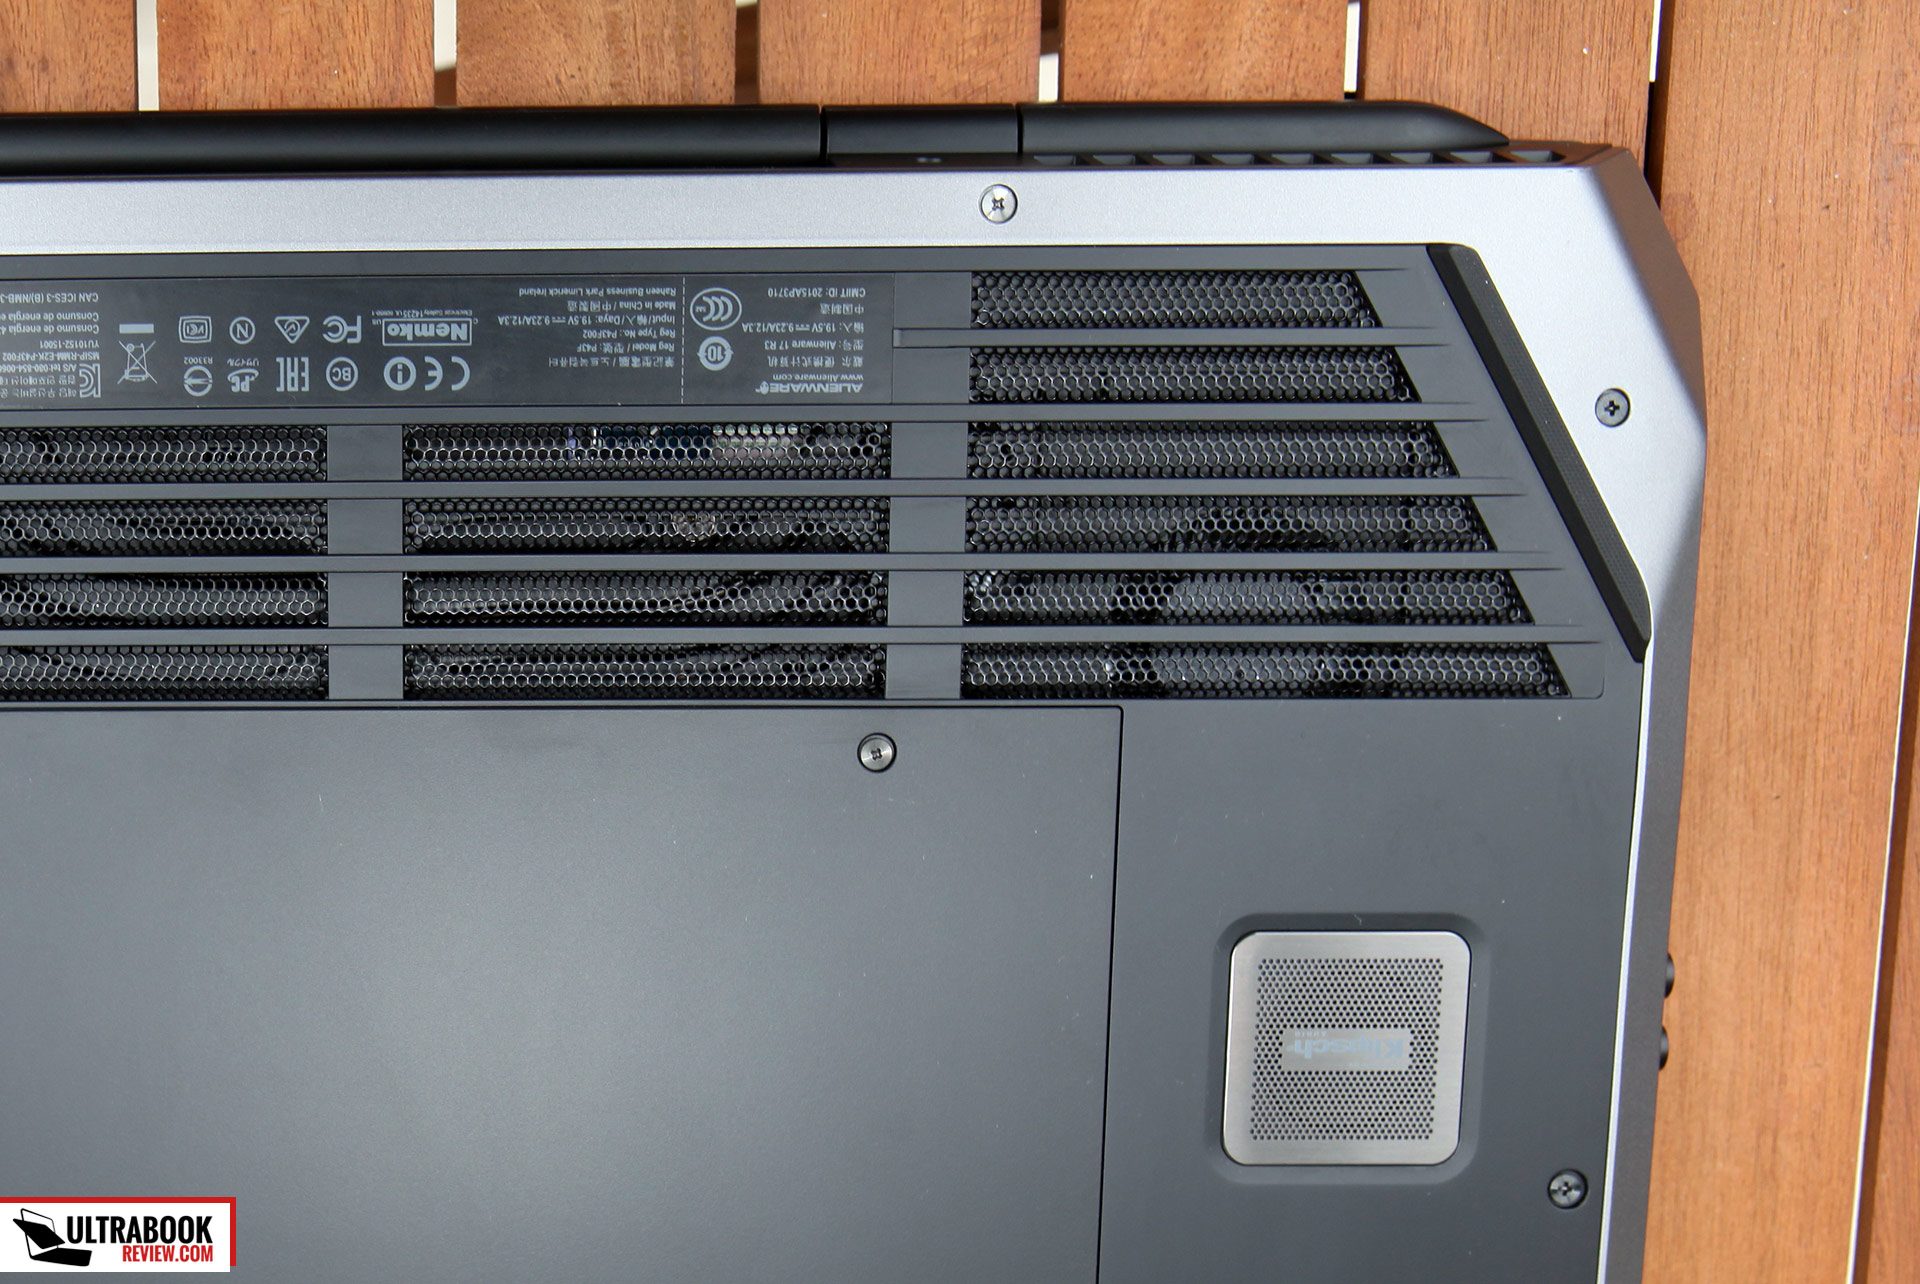
On the back edge, you have the exhaust vents on each side for both the CPU and GPU. In the center, there’s also a couple more connections – an HDMI 2.0 port and a special connection which is used to attach an Alienware Graphics Amplifier.
There aren’t any connections on the front side, but instead there are front facing speakers. This is a welcome departure to bottom facing speakers and makes good use of all the real estate they have on the front lip. Along the bottom of the speakers there are some more light effects which can also be changed to the color you desire.


Keyboard and trackpad
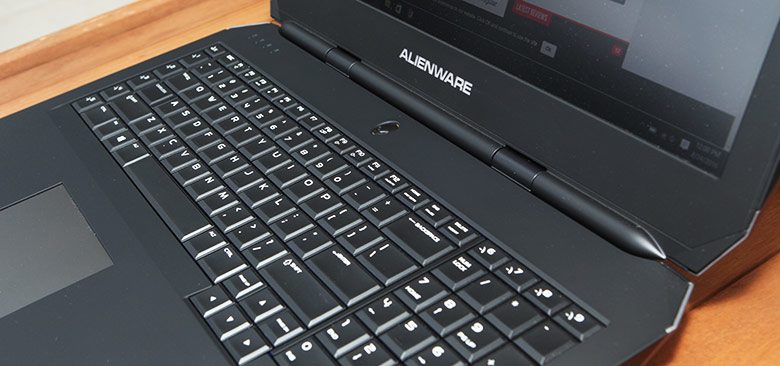
Dell certainly keeps up their good track record with keyboards (at least from my experience) with the Alienware 17. The keys are laid out very well and are properly spaced apart. There’s plenty of space to have proper sized keys, such as the right shift and arrow keys, which I really appreciate.I was immediately able to adapt to it and type naturally. After using it for only an hour, I scored a 47 wpm on a typing test, and I typically score 50ish on the keyboards I’m used to. The keys have excellent feedback and good travel. Touch typists should have no issues getting used to this one.
Like all previous Alienware keyboards, it is backlit and you have the ability to control the color of the backlighting. It’s not like on Razer or MSI devices where you have millions of color choices out of the box, but Dell gives plenty of options to choose from and the colors look even throughout the keyboard. Oddly enough, Dell removed white from the color choices, possibly because the trackpad looked a little pinkish. But if you’re comfortable editing the config files with a text editor, you can pretty much choose white and any other color by editing the color hex codes.
Unfortunately they neglect something that pretty much every other gaming laptop has – the ability to disable the Windows key. It’s kind of comical because I literally have had that feature for a few years in the laptops I’ve owned, but have never needed it…until now. For some reason I just can’t stop pressing it on the Alienware 17 and it drove me nuts enough to download Autohotkey to disable it.


The trackpad is nothing special really. It’s not bad, but definitely nothing to brag about. For starters, I found it kind of small – especially considering there’s so much space for something larger. The buttons are also kind of mushy, but they work good enough to do what you need to.
It’s a Synaptics touchpad so the drivers and gestures were pretty familiar and I was able to optimize the settings to my liking. I’m used to buttonless trackpads and I was still able to use it as if it didn’t have buttons (two finger taps for right clicks work fine). I did appreciate the buttons on long drags though, so it’s a plus to have them.
My biggest gripe with the trackpad is the texture. They could have gone a little smoother on this one as it’s a little too cheap feeling for my taste. I was able to track properly and initiate multi-touch gestures pretty well for the most part, but only after I updated the drivers and meddled with the sensitivity settings a lot. Long story short, I could live with it.
One added feature, pretty useless in my opinion though, is the trackpad’s backlight, which glows whenever you touch the surface. You can set it to any color, just like you can on the keyboard. It’s cool to look at for a few minutes but I just don’t see any practical use for this other than showing off. The trackpad is so recessed into the palm rest that I could not imagine not being able to find it without the backlight on.


Screen
The model I received has a 17.3-inch 3840 x 2160 px resolution panel, made by AU Optronics(part number B173ZAN). Let me come right out and say it – this screen is absolutely beautiful! Not only is it an IGZO IPS screen with excellent viewing angles, it’s also full gamut, covering 100% of the sRGB spectrum. The colors look absolutely amazing and I officially take back all of my prior opinions on full gamut screens being overkill. This is my new favorite panel.Looking closely, I couldn’t find any dead pixels or even a hint of backlight bleed. That’s not to say it’s not possible though, because a couple of buyers on the forums have complained about minor bleed in the corners. The screen is so darned bright though, so I can imagine some that are overly sensitive to it would complain a little.
It’s hard to complain about anything else though, but if I had to pick anything to improve, I guess it could the matte finish. It’s not as bad as on other Dell monitors I’ve seen in the past but it’s still pretty thick. Not as bad as where the image becomes distorted or anything – so don’t worry about that. It’s more like it’s at the high limit of my comfort zone.


Speaking of brightness, Dell advertises the panel to be 400-nits. My measurements were pretty close but not quite that high. It could be the matte finish or the accuracy of the instrument, but I’m still impressed with the results. The maximum brightness measured out to 355 nits and blacks, at that brightness, measured at .56 nits. Outdoors, the screen is perfectly viewable in the sunlight, with only minor color washout. I was able to use it on my pool deck at 1pm with no glare issues.
I also checked the brightness distribution, which you can see below. This panel is about as evenly lit as I’ve ever measured, so no complaints here. Again, the max was 355, not 400, but it’s still plenty bright enough.
 Also it should be noted that my measurements while on battery were nearly the same as when on power.
Hardware and performance
My Alienware 17 came with an Intel Core i7-6700HQ quad core CPU and an Nvidia GTX 980M GPU. The 980M I received has 4GB of VRAM, which is plenty enough for me. But if you want more, rest assured because the newer units sold all have 8GB of VRAM. My unit also came with 16GB of DDR4 2133 Ram, so there’s little need to upgrade it any further. If you wanted to though, this laptop supports 2 x 16GB chips according to the forums.


I ran all the typical benchmarks to test both the CPU and GPU on this unit. The only surprise was the PCMark score, which was actually lower than previous Haswell models I’ve seen. But other benchmarks actually lined up as expected. Here are my results:
- 3Dmark 11: P11294 with CPU at 67°C and GPU at 58°C;
- 3Dmark 13: Cloud Gate – 18463, Sky Diver – 20353, Fire Strike – 8148;
- PCMark 08: Home Conventional – 2764, Home Accelerated- – 3183;
- CineBench 11.5: OpenGL 47.88 fps, CPU 7.43 pts, CPU Single Core 1.44 pts;
- CineBench R15: OpenGL 62.95 fps, CPU 680 pts, CPU Single Core 129 pts.


- Fallout 4– Ran from one end of the Commonwealth to the other, constantly looking and shooting all over the place.
- Ultra settings, Max AA and AP 1080p – Solid 60fps with occasional drops to 55fps. Solid performance!
- Default high settings at 4k – 25-33fps.
- Default medium settings at 4k – 30-40fps
- Peak CPU temp 72°C, peak GPU temp 64°C
- Crysis 3– Played through the opening scene for 10 minutes
- Very High settings, no AA 1x AF, 1080p – 46-58fps
- High settings, no AA, 1x AF, 1080p – 60fps with minor drops to 55fps
- Medium settings, no AA, 1x AF, 4k – 25-36fps
- Peak CPU temp 78°C, peak GPU temp 72°C
- Dragon Age: Inquisition – Walked around one of the first camps and got into a battle. Played for about 10 minutes for each session.
- Default ultra settings at 1080p – 35-40fps
- Default high settings at 1080p – 60fps
- Default high settings at 4k – 20-25fps
- Default medium settings at 4k – 30-35fps
- On battery: Ultra 1080p settings – 20-30fps
- Peak CPU temp 74°C, peak GPU temp 66°C
I was also able to monitor the VRAM in the games I played. The most usage I saw was only 3GB, so for most of you the 4GB model would be enough. 8GB is certainly overkill, but makes this machine highly futureproof though, so if you’re a modder or one to keep laptops for many years, the 8GB model might be the model for you.
Graphics Amplifier
One feature that I can’t review here, but thought I should discuss, is the Alienware Graphics Amplifier. There is a dedicated port on the back of the laptop which allows a connection to an external GPU. This requires an Alienware Graphics Amplifier, which is available to purchase in many stores such as Amazon, Best Buy and Dell.You’ll be able to configure it with any recent graphics cards, including the GTX Titan or 980, which can output to all of the monitors that you can hook up to the card. This would certainly improve the graphics performance, depending on the card you choose to use. It may not be so relevant with the 980M version of the Alienware 17, but it opens up more options for the lower end models.
Unfortunately I don’t have one to test out, so I can’t offer any more info on it. I might buy one in the future, but I’m holding off to see when the Razer Core comes out. My hopes are the Razer Core will be compatible with the Alienware 17 since it has a Thunderbolt 3 port. Stay tuned for that.
Noise, Heat, Connectivity, Speakers and others
Being as big as it is, Dell certainly had enough space to put a decent cooling system in this laptop. As I mentioned before, the intake vents on the bottom are very large. This makes them difficult to block when using the computer on your lap, which is a good thing. In fact, when those fans are spinning, it actually feels great to have a breeze rushing my by knees.The only trouble I’ve found, though, is through normal tasks. The fan profiles that Dell set for this machine favor quietness, which is both good and bad. The fans are basically at a minimum speed for normal tasks, which keeps things quiet. Unfortunately the heat just builds up though and it only gets removed when it hits a particular level – a high one in my opinion.
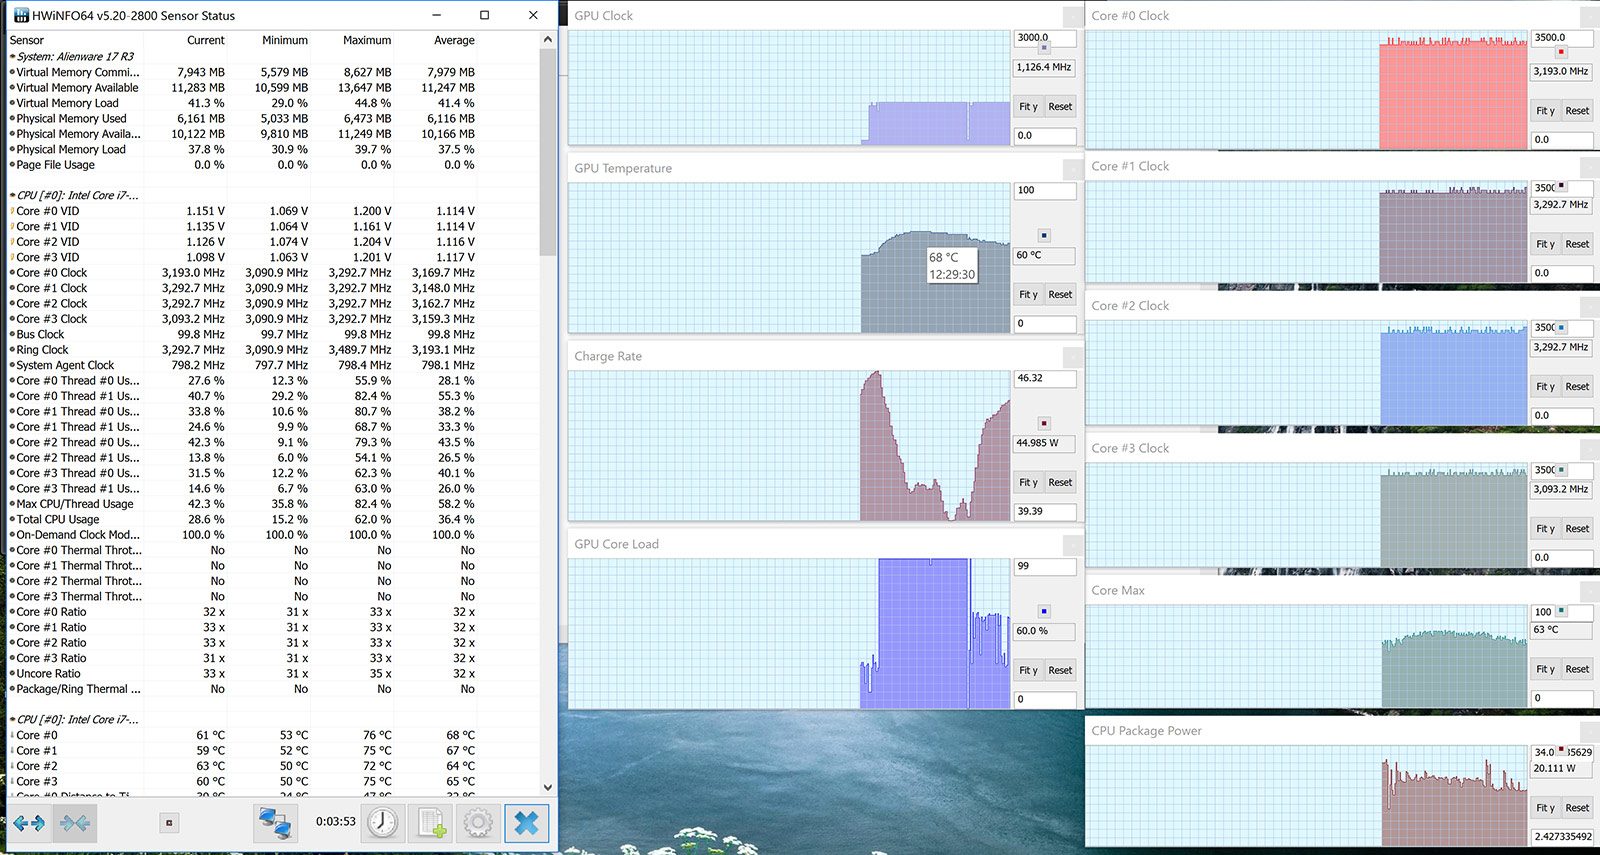
I took some thermal readings on the top and the bottom, both during normal usage and my Fallout 4 test. I also took some readings with the fans turned all the way up. Here were my results:


 *Daily Use – 1080p Youtube clip in Edge for 30 minutes
*Load – playing Fallout 4 for 30 minutes
*Fans Fully Blowing – set at 5000 rpm from HWInfo while playing games
So as you can see, the normal load values aren’t all that much different than the gaming results. In fact, I was actually surprised of those gaming numbers since gaming on the lap was actually pretty comfortable, for the most part. I certainly wasn’t expecting to get values in the 45°C range. It could be the convection from the breeze by my legs that aided in the comfort. Still, it’s a huge improvement over the comfort of my left leg while gaming with my GS60 (which reaches 50°C under heavy load).
Moving on to the internals, at no point in all my testing did the CPU ever break 80°C. Specifically, the maximum reading I recorded was 78°C and that was after a long gaming session of Crysis 3. The GPU faired even better, only reaching a maximum of 72°C. This is pretty good considering some of the thinner rivals often reach temps over 90°C on both the GPU and CPU, and it’s a strong selling point for thicker laptops with high end cards.
Moving onto the fan noise, I was really impressed with what I experienced. It can also be attributed to the thicker form factor, because Dell could use larger fans at a lower rpm to remove heat. I used my sound app to measure the noises the fan made in a quiet room. Here’s what I got:
- Ambient noise in the room: 22dB;
- Idling with lowest CPU fan speed, GPU fan off: 25dB;
- Both fans on: 25dB;
- Max measure during gaming: 30dB;
- Maximum fan speeds using HWinfo: 40 dB .
Since I brought up HWinfo, I want to point out another feature that Alienware continues to miss – fan control. There’s no real good way to control the fans and I think they should really start to listen to their customers on this one. The easiest way is to use HWmonitor, which isn’t that easy at all. I still haven’t figured out how to edit the EC profile like others have and I have only been able to turn the fans on full blast or half speed. The other alternative is to turn on high performance mode in the bios, which merely ramps the fans to full speed at all times. That’s probably something you will want to do if you only play games on headphones or use your laptop permanently as a desktop server or something.
I did do a minor amount of testing with the fans at full speed. I played a one hour Fallout 4 session on Ultra at 1080p. The max CPU temperature was only 64° with the average being 56°. The GPU never passed 56° and hovered around 54° for the most part. It also felt very comfortable on my lap and I didn’t mind the fan noise since the speakers were so loud. I’d probably do this for long gaming sessions, but it is annoying I have to launch HWinfo to do it.
One last thing I’d like to mention is the level of improvement many have experienced through repasting the CPU and GPU. Of course, this is no straight forward task, but the Alienware community is quite large and the successes from repasting have been documented. Many have also made guides on how to do it, which is super important to first time repasters (is that a word?). You’ll find them on various forums, Google is your friend here.
Radios – For connectivity, Alienware decided to go with the Killer N1535 Wireless AC, which like the N1525, is a great wireless card to have. For my couple weeks of usage, I had a pretty solid connection for the most part. I did have a couple drops early on but after updating my drivers, I’ve been good to go since. At 30 feet from my router, I reached download speeds of over 60Mbps. There is also a Killer E2400 gigabit Ethernet controller onboard and of course a Bluetooth 4.0 controller embedded with the WiFi chip.
Speakers – I did my homework before purchasing the Alienware 17 and one of the constants in most of the reviews I read was the sub-standard sound it had. Maybe they were talking about the r2 version, but I really don’t think it’s that bad at all. If anything, it’s one of the better sounding speakers I’ve heard on a gaming laptop since the Y50.
The Alienware 17 has two front facing speakers on the front edge of the laptop, so the sound isn’t muffled unless you are smothering that edge for some reason. There is also a subwoofer on the bottom to handle the lows, so the front speakers can concentrate on the highs and mids.


After a little tweaking, I was able to get some killer sounds out of this thing. Even to the point where I did long sessions without headphones at all. The maximum decibels I could achieve was 90dB, which far exceeds the fan noise. At no point did I experience any cracking or popping, but I’m sure if I messed with the sound settings inappropriately, that could happen.
With the subwoofer all the way up, I was able to distinguish the bass at frequencies as low as 20Hz. Don’t get too excited though – this is still a small speaker. You’re not going to hear any thumping or feel the vibration or anything. It’s just a step up from the tinny speakers found on most other notebooks.
In short, I’m pretty happy with the sound. Maybe others were expecting more or I’m just not an audiophile, but I would be perfectly content playing games on this laptop without headphones. There’s not a single gaming notebook I’ve used before where I could say that, except the Lenovo Y50(Y500, Y510p, etc).
Battery life
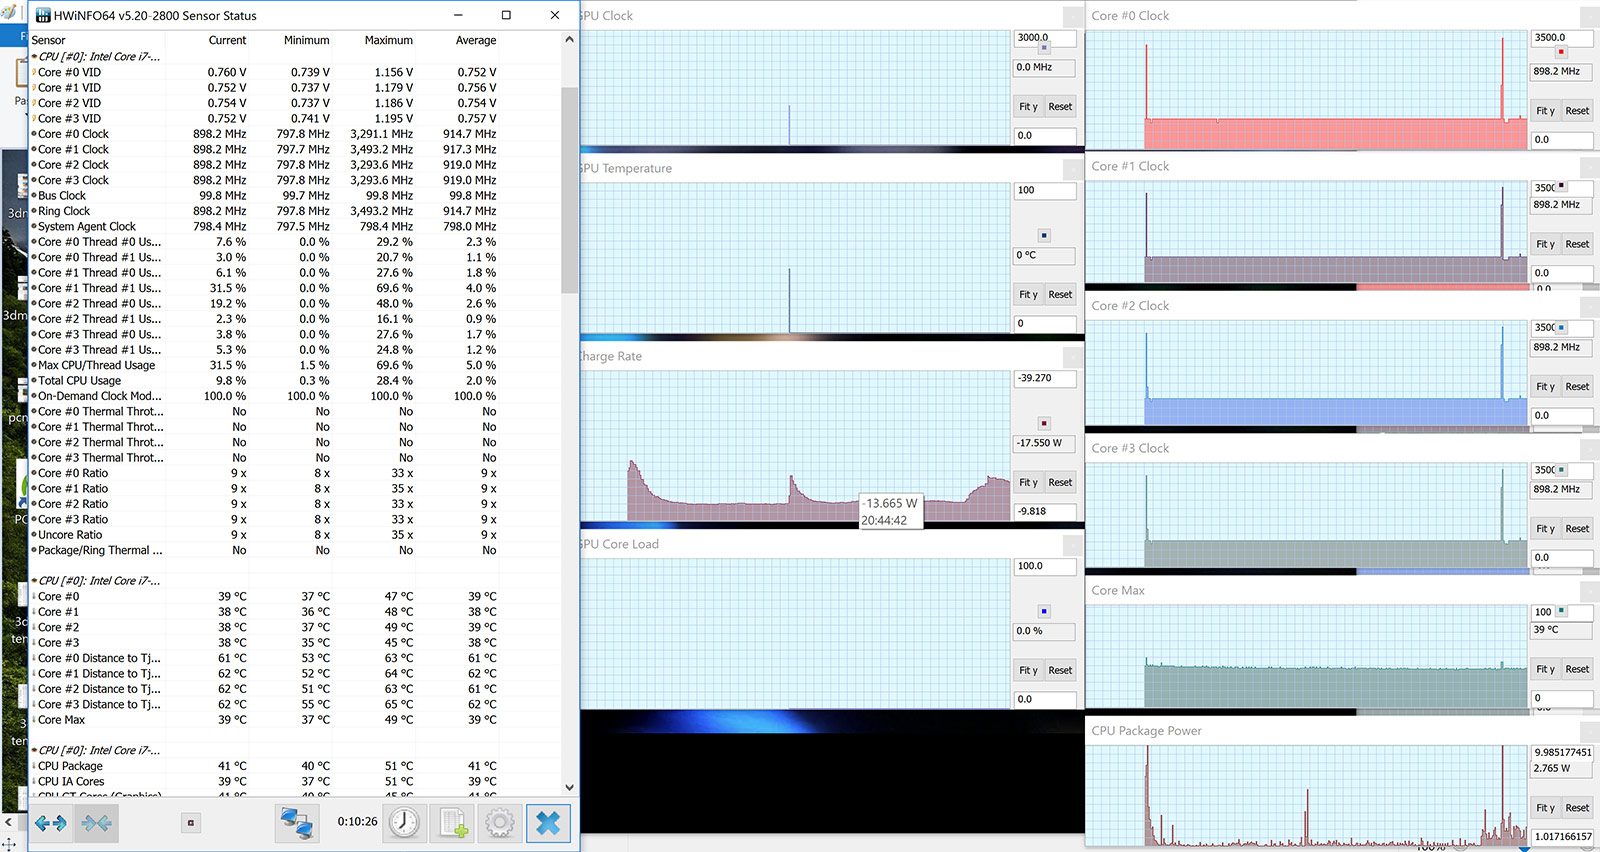
Using HWinfo, I was also able to test the discharge rate at certain conditions and estimate how long the laptop would last in those cases. Wifi and Bluetooth were on for all situations and the volume was set at 30%. Here are my results:- 11 W (~8.5 h of use) – idle, Power Saving Mode, screen at 0%, Wi-Fi OFF;
- 14 W (~7 h of use) – very light browsing and text editing in Google Drive, Balanced Mode, screen at 30%, Wi-Fi ON;
- 16 W (~6 h of use) – 4k fullscreen video on Youtube in Edge, Balanced Mode, screen at 30%, Wi-Fi ON;
- 16 W (~6 h of use) – 1080p fullscreen video on Amazon Instant Video in Edge, Balanced Mode, screen at 30%, Wi-Fi ON;
- 5 W (~7 h of use) – 1080p fullscreen .mkv video in the Movie app, Balanced Mode, screen at 30%, Wi-Fi ON;
- 27 W (~3.5 h of use) – heavy browsing in Edge, Balanced Mode, screen at 30%, Wi-Fi ON;
- 91 W (~1 h of use) – gaming, Dragon Age Inquisition 1080p High – 45 Fps limit.
The 92HW battery inside allows this laptop to last for quite a while on a charge
Price and availability
The model I received is available on Amazon here. There are also quite a few other configurations available, including versions with a 1080p screen and a 970M instead of the 980M. You can find those models through this link.Dell also has many different configurations on their website, including 980M models with 8GB of Vram. There are also a few different options for the SSD. The prices there are a little steep, so if you’re patient, you might want to wait for a sale.
Lastly, if you’re looking for something a little cheaper, you could also look into the R2 model of the Alienware 17. It’s mostly similar, but is built on a Haswell processor, supports DDR3 RAM and does not have a Thunderbolt 3 port. Also, from what I understand, it uses a different version of the Alienware Graphics Amplifier and a different kind of screen.
Final thoughts
I’ve been really happy with the Alienware 17 R3 in these few weeks I’ve had it. Sure, it’s twice as heavy and twice as thick as my GS60, but it has some pros that make it a desirable machine for me to have around. For starters, the overall performance is incredible. Every game I’ve been able to throw at it played smoothly at FHD settings. On top of that, it runs relatively cool, especially considering it has the top mobile GPU inside.Another major attraction of the laptop is the 4k screen. It’s literally the nicest panel I’ve ever seen and I’ll probably have a tough time looking at anything else from now on. Not all games play well at 4k, but the screen interpolates to 1080p just fine. Plus, since it’s a 17-inch screen, there were no significant scaling issues, so that’s another plus.
With all that in mind and the fact the sound is also really good, I think I’m actually going to keep this one and sell my GS60. Yes, it’s going to be heavier and it won’t be travel friendly, but I have travelled with the GS60 less and less as of late and I can certainly deal with carrying the Alienware around my house.

The Alienware 17 R3 is a keeper!
As far as the competition goes though, I don’t think there are many that fill the gap in these areas. If anyone can think of any, please leave a comment and let me know. Still, you could also have a look at your reviews of the Acer Predator 17 and the Asus ROG G752, which are some of the best alternatives one could consider.
Anyway, this wraps up my review. I hope it was informative enough to give you an idea of what to expect with the Dell Alienware 17 R3. Since I’ll be having the laptop for a while, please feel free to ask any questions below. I’ll do my best to answer.


